I used Docker to install the latest NextCloud and Onlyoffice, and found a strange problem. If I open and edit the docs file in Onlyoffice and then download it directly from NextCloud, I cannot get the latest updated file. All logs did not report any errors.
I don’t know if it’s an error or a configuration error? But it can be guaranteed that they are all default settings obtained from official sources.
Hello @sam123,
Please provide the screen recording of the issue reproduction on your side.
So, are you using Onlyoffice Docs 8.3.1, NC 31 and Connector 9.7.0?
Please still provide us all the logs after the issue reproduction (including Nextcloud Logs - Administration Settings → Logging)
I only used ‘only office/documentserver’ (container image name) And Nextcloud (container image name) is the latest, which can cause issues in the theme
I will provide screenshots later, but I will provide the steps for reproducing the text
Steps to replicate it (hint: details matter!):
Create a new document from NextCloud and open it using Onlyofice.
After opening, enter any characters, then press Ctrl+S to save the document and close only office.
Download this document from NextCloud to your local device
Open this document from the computer.
This document is not the latest, but rather the one before the ‘only office’ editing
logs:
nextcloud.log (245.3 KB)
onlyoffice.log (37.8 KB)
We haven’t been able to reproduce the issue for now, please still provide the screen recording as well as the versions used
Step screenshot
thanks!!!
Step screenshot.docx (279.8 KB)
nextcloud version (Nextcloud Hub 9 (30.0.5))
how to view onlyoffice doce version?
nextcloud onlyoffice apps version is ( 9.7.0)
Generally, the version of the Document Server can also be seen in ds-docservice.conf (/etc/nginx/includes - inside the container), please provide the file to us.
Could you create a user on your Nextcloud and provide us the credentials for quick test? (you can send the details in PM)
It has been confirmed that it was caused by the closure of JWT, but the specific reason is not quite clear.
Is there any code that can refresh in real-time by changing the local. json of only office?
No, changes to local.json in OnlyOffice Docs typically require a restart of the Document Server to take effect.
If JWT is enabled on one side, but is disabled on the other, it can cause issues, always make sure that the secrets and headers coincide (as well as the time of the servers where Onlyoffice Docs and Nextcloud are deployed)
Is the issue still present?
很抱歉,您会中文吗,我很难去翻译这段话。我想说的是,要是启用了JWT似乎就能解决现在延迟同步的问题,还有似乎修改了local.json有关代码后就能更加实时的去同步到nextcloud(未知道具体代码)
我两侧都启用了JWT,标头,时间一致
我是否理解正确,问题已解决由于您采取了两个步骤 - 首先,在 local.json 中编辑了一些内容(但您不确定具体是什么);其次,在双方都启用了 JWT
是的,社区测试过吗,不清楚能否有这种BUG,我所有的配置保持了默认仅开启了JWT(local.json再算不修改也只是不实时保存。)谢谢您
通常情况下不应该出现这种情况,这样的情况发生比较奇怪。您是否使用任何代理?您还提到对 local.json 进行了一些更改,但您不记得具体内容,也许问题就出在这里
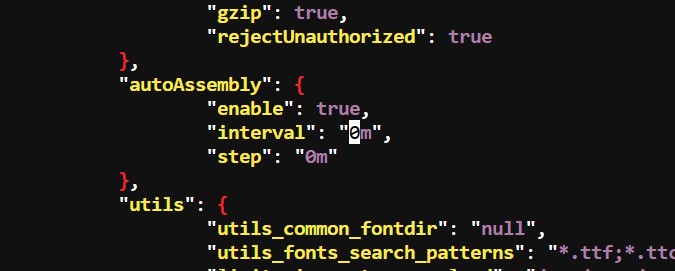
您好,我重新根据[Configuring ONLYOFFICE Docs Community Edition] 对其onlyoffice中的/etc/onlyoffice/documentserver/default.json进行了配置,之后所下载的文件即是实时的,我另外一台服务器复现了这个问题。修改的配置另附在截图中。
系统:centos 7
16G内存
其实我不明白为何这样即可,其他的机器都不会这样的,我认为还是和centos7与docker还有onlyoffice的隐形故障?
请检查在最新版 8.3.3 搭配 Nextcloud 31 和 Onlyoffice Connector 9.8.0 时是否会重现该问题。
我按照您建议的方式为这些版本 (在Docker安装) 跟您一样设置了上述的参数,问题并未重现
注意,上面的设置是我的解决办法,而并非问题复现办法,谢谢您。
弄了个操作文档,这是复现问题的方式。
请注意系统版本最好是centos 7.2009(确实已经停止了服务)
install system(centos 7.2009)
#cmd
#替换软件存储,原因是centos7服务结束

sed -e "s|^mirrorlist=|#mirrorlist=|g" \
    -e "s|^#baseurl=http://mirror.centos.org/centos/\$releasever|baseurl=https://mirrors.tuna.tsinghua.edu.cn/centos-vault/7.9.2009|g" \
    -e "s|^#baseurl=http://mirror.centos.org/\$contentdir/\$releasever|baseurl=https://mirrors.tuna.tsinghua.edu.cn/centos-vault/7.9.2009|g" \
    -i.bak \
    /etc/yum.repos.d/CentOS-*.repo

#缓存,加入docker源,然后安装docker
yum makecache
yum install -y yum-utils
yum-config-manager --add-repo https://download.docker.com/linux/centos/docker-ce.repo
sed -i 's+https://download.docker.com+https://mirrors.tuna.tsinghua.edu.cn/docker-ce+' /etc/yum.repos.d/docker-ce.repo
yum install -y  docker-ce docker-ce-cli containerd.io docker-buildx-plugin docker-compose-plugin

#关闭防火墙
systemctl disable --now firewalld

#关闭selinux
cat >/etc/selinux/config <<EOF
# This file controls the state of SELinux on the system.
# SELINUX= can take one of these three values:
#     enforcing - SELinux security policy is enforced.
#     permissive - SELinux prints warnings instead of enforcing.
#     disabled - No SELinux policy is loaded.
SELINUX=disabled
# SELINUXTYPE= can take one of three values:
#     targeted - Targeted processes are protected,
#     minimum - Modification of targeted policy. Only selected processes are protected.
#     mls - Multi Level Security protection.
SELINUXTYPE=targeted
EOF

#立刻生效
setenforce 0

#不可访问docker_hub,使用镜像源
cat >/etc/docker/daemon.json<<EOF
{
    "registry-mirrors": [
        "https://docker.1ms.run",
        "https://docker.xuanyuan.me"
    ]
}
EOF

#开启docker,并且开机自启
 systemctl enable --now docker

#安装docker_compose

yum install -y wget

wget https://github.com/docker/compose/releases/download/v2.32.1/docker-compose-linux-x86_64

cp docker-compose-linux-x86_64 /usr/bin/docker-compose

chmod a+x /usr/bin/docker-compose

docker-compose --version
#输出版本号即可

#开始
mkdir /root/nextcloud/
touch /root/nextcloud/docker-compose.yml
cat >/root/nextcloud/docker-compose.yml<<EOF
services:
  db:
    image: mariadb:10.11
    restart: always
    command: --transaction-isolation=READ-COMMITTED --log-bin=binlog --binlog-format=ROW
    volumes:
      - /opt/snextcloud/mysql:/var/lib/mysql
    environment:
      - MYSQL_ROOT_PASSWORD=nextcloud@123
      - MYSQL_PASSWORD=nextcloud@123
      - MYSQL_DATABASE=nextcloud
      - MYSQL_USER=nextcloud

  redis:
    image: redis
    restart: always

  nextcloud:
    image: nextcloud
    container_name: nextcloud
    restart: always
    ports:
      - "443:443"
    depends_on:
      - redis
      - db
    volumes:
      - /opt/nextcloud/data:/var/www/html
    environment:
      - MYSQL_PASSWORD=nextcloud@123
      - MYSQL_DATABASE=nextcloud
      - MYSQL_USER=nextcloud
      - MYSQL_HOST=db
      - REDIS_HOST=redis
      - PHP_MEMORY_LIMIT=4096M
      - PHP_UPLOAD_LIMIT=101024M
      - APACHE_BODY_LIMIT=4294967296
      - NEXTCLOUD_TRUSTED_DOMAINS={{YOU_SETRVER_IP}}
      - NEXTCLOUD_ADMIN_USER=admin
      - NEXTCLOUD_ADMIN_PASSWORD=nextcloud@123
  onlyoffice-1:
    image: onlyoffice/documentserver
    container_name: onlyoffice1
    ports:
      - "4431:443"
    environment:
      - JWT_ENABLED=true
      - JWT_SECRET=71tlgym7vuricscdjpfcsscc
      - ALLOW_META_IP_ADDRESS=true
      - ONLYOFFICE_HTTPS_HSTS_MAXAGE=31536000
      - SSL_CERTIFICATE_PATH=/var/www/onlyoffice/Data/certs/onlyoffice.crt
      - SSL_KEY_PATH=/var/www/onlyoffice/Data/certs/onlyoffice.key
      - USE_UNAUTHORIZED_STORAGE=true
      - ALLOW_PRIVATE_IP_ADDRESS=true
    volumes:
      - /opt/onlyoffice/certs:/var/www/onlyoffice/Data/certs
    restart: always
EOF

#到达目录执行docker-compose程序
cd /root/nextcloud/
docker-compose up -d


#申请自签名证书
openssl genrsa -out server.key 2048
openssl req -new -key server.key -out server.csr
#没有其他情况的话,上面的命令全部按确认键

openssl x509 -req -days 365 -in server.csr -signkey server.key -out server.crt


#证书放入

docker cp  server.key  nextcloud:/etc/ssl/private/ssl-cert-snakeoil.key
docker cp server.crt  nextcloud:/etc/ssl/certs/ssl-cert-snakeoil.pem

#进入终端修改
docker exec -it nextcloud bash

cat >/etc/apache2/conf-enabled/apache-limits.conf<<EOF
LimitRequestBody 0
EOF


#执行,有错没关系
a2enmod ssl
a2ensite default-ssl
#退出
exit

docker restart nextcloud


#onlyoffice的证书设置
docker cp server.crt onlyoffice1:/var/www/onlyoffice/Data/certs/onlyoffice.crt
docker cp server.key  onlyoffice1:/var/www/onlyoffice/Data/certs/onlyoffice.key


docker restart onlyoffice1


#本次的版本
Nextcloud Hub 10 (31.0.2)
onlyoffice/8.3.3.18

#执行应用商店安装onlyoffice即可,之后在设置中设置onlyoffice连接。
ONLYOFFICE
服务器设置
ONLYOFFICE Docs 位置指定了安装了文档服务的服务器的地址,请将'<documentserver>'改为下面一行中的服务器地址。

#ONLYOFFICE Docs地址

https://192.168.11.70:4431/

#勾上关闭证书校验

#秘钥(留空为关闭)
71tlgym7vuricscdjpfcsscc


#完成后新建,下载文档即可。
#发现想复现的话,可能需要更快速度去单击下载文件(提前保存才有可能发生)
#又或者必须保存文件直接返回文件列表下载文件。
#不知道是否与selinux有关系,请试着开关selinux并且重启。
所以,您是在同一台机器上同时安装了 Nextcloud 和 OnlyOffice Docs,这可能会导致您提到的问题,请您试试在两台机器使用。
强烈建议将两者安装在不同的机器上。另外,请提供保存问题复现过程的录屏